Posts Tagged 'project'

The Psychology of Pysanky

Hi again all!

Easter is almost upon us again, and the time has come when that traditional Easter Egg shape (or “Spring Sphere” shape, depending which circles you run in) just seems to be calling out for a decorative touch.

Whatever you call them, these blank little ovoids seem to be the perfect canvases for a wide variety of paint and dye techniques. One of the more homespun methods of decoration also happens to be one of the most intricate and spectacular.

Pysanky is a form of egg decoration that uses various dyes and a wax resist, like batik. It may be one of your Ukranian grandmother’s favorite hobbies, but it also lends itself to an almost unending series of reinventions.

A little while back, I was lucky enough to find a class in the area that taught this spectacular technique. I have to admit, it’s sort of impossible to get the awe-inspiring results seen below from only a 3 hour session, but it was a decent introduction to the process.
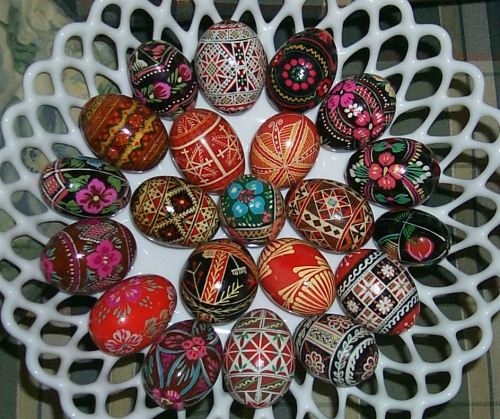
http://spindlesend.net/images2/Misc/P0001432.JPG

Essentially, you draw on your basic geometric breakdown lightly with a pencil, heat a very simple small metal funnel called a kitska over a flame, and use it to paint beeswax resist over an ever-darkening series of dye layers on your egg.

What this meant to my design above was that I painted beeswax where I wanted the white of the design to be. Then, I dyed the egg yellow. I painted the beeswax over the part of the egg where I wanted the yellow to be, and then tinted a section of my egg green. And so on and so forth until you end with your black dye. Then you melt all of your beeswax off with a candle.

As a perfectionist, this particular craft pursuit could easily have driven me to the point of a nervous breakdown, especially due to the 3 hour time constraint. And, note to all of you who may want to try pysanky in future, do NOT try to down a mug full of coffee before trying this for the first time…

But, no offense to the sudoku aficionados out there, I think this is a way more fun method of training your brain to think backwards and plan ahead.

So everyone out there with a Ukranian grandmother, go tell her she’s awesome, just because. And if you’d like to learn more about the art of pysanky, please see this generously free tutorial site.

Happy Easter everyone :-)

Halloweek kickoff (or Jack O’ Lan”tee”)

I must confess that I am a little bit behind the 8 ball this year in getting ready for Halloween…

Here it is the week before the big day, and I don’t even really have my decorations out. Also, I really have no idea how I am going to slap a costume together in time for the big Halloween party this weekend!

So, in honor of all of us who life just seems to sneak up on sometimes, I present to you: “Halloweek.” This week, I will attempt to post a collection of Whoomp There it is, all victory, no-waiting, quick crafts for the time-deficient Halloween lover.

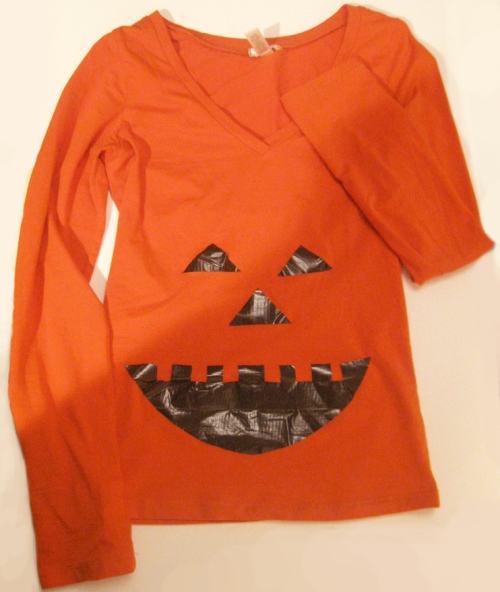
Today we will start with my slap-dash Jack-O-Lantern t-shirt. You can use this shirt as a costume on short notice (my boyfriend and I did that last year), or just as an excuse to be crafty and say “hey I’m festive” in a semi non-committal way. Even if you just want to hand out candy in this bad-boy, the lucky people visiting your door will be thrilled to see the smile on your face…and on your tummy.


You will need:

  • Orange or orangish t-shirt (wash it first to remove sizing if this is a brand-new shirt; it will help the tape stick better)
  • black duct tape (or regular duct tape and a black Sharpie if you’re really low on time); I used black Duck Brand duct tape from my local Michael’s
  • Scissors
  • waxed paper (this makes your life SO much easier, trust me)
  • optional*: white washable fabric marker (or one of those left over, thin,  almost useless bars of soap from the shower) to mark where you want your jack o’lantern face on your t-shirt


  1. Try on your shirt and see about where you want the face to be. Ladies, please pay special attention to this step. I strongly suggest that you don’t put the eyes on the t-shirt without testing first….unless you are going for a very attention-grabbing look. If you are, then throw caution to the wind :-) If you like, use the white fabric marker or the side of the bar of soap to mark the locations of where you would like the eyes and mouth to be. Then remove the t-shirt and lay it flat.
  2. Next, unroll lengths of your duct tape. If you are making black duct tape from regular with a Sharpie, now’s the time to color it in. (Note: Please factor in some time for the marker to dry before doing any of the next steps. I cannot guarantee that the marker won’t rub off later anyway, but patience is your best bet here).
  3. Place the sticky side of the duct tape down on the waxed paper. Smooth out the tape as best you can to make it flat to the paper; This should prevent the tape from sticking to your scissors while you cut, making it easier to cut the tape precisely the way you want it. TIP**:It may make it a little easier if you let the tape overhang the wax paper slightly at this point. It will make it easier to peel the wax paper off later.
  4. Now, freehand cut some triangle shapes from the duct tape with your scissors to make your jack o’lantern’s eyes. It’s best to start off bigger than you think you need and then reduce the size later. Also, if you want your eyes to be the same size/shape, cut one eye out first, and then use this cut out as a template to cut out the other eye. Trim as needed.
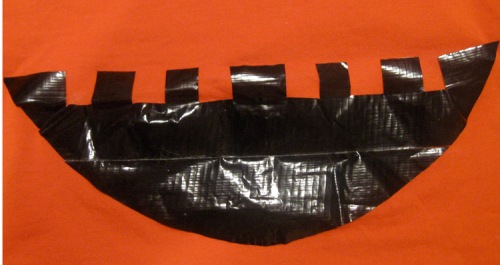
  5. Next, make the jack o’lantern’s mouth. Please notice above that I overlapped two strips of duct tape to give the mouth more “height”. Place these overlapping strips sticky-side-down on the waxed paper as well. And now for the big tip!!!  TIP**: To make a symmetrical mouth, fold the black tape in half so that the wax paper sides are touching. Freehand cut some teeth from the outside of the strip of tape in towards the center fold. Stop when you have cut almost to the fold line. Then cut a “half tooth” shape directly at the fold line. This should give you symmetrical teeth with one big tooth in the center of the mouth.
  6. Now, before you remove the waxed paper backing from the cut tape pieces, place your eyes and mouth on the t-shirt to confirm that they’re the right size,  and to finalize where you want them. Please make sure the t-shirt is stretched out flat and that it’s not too wrinkly when you do this. I wouldn’t use the picture of my t-shirt above as an example of “not too wrinkly” though, for this is not the case….
  7. If you like where the facial features have been placed, now comes the tricky part. Try to remove the waxed paper from the tape pieces. It’s easier if you try to free the paper at one of the points or corners. Using the scissors, a pin, or your fingernails also helps.
  8. Once you have done this, smooth the eyes and mouth onto the t-shirt where you want them.
  9. Voilá! Your Jack o’t-shirt is ready for wear.

Happy Crafting, and Happy Halloween!


The Shirt off My Back

I kind of love fleur-de-lis.

I think I can trace it back to reading The Once and Future King back in grade school. I just remember reading about Guinevere, pining away for Sir Lancelot and embroidering fleur-de-lis in the lining of the helmet he left behind… <sigh> I loved that story. Still do.

But anyway, my lingering love for this motif led me to want to make the above t-shirt. I used just a few simple tools, not a fancy screen-printing kit or special materials, to make it.

If you’d like to find out  how to make a shirt like this (and/or see the back), please continue reading. Hope you’re all having a nice summer!

Continue reading ‘The Shirt off My Back’

Roll your own and save the planet

Since Earth Day 2010 is today,  April 22nd, I thought it would be fun to do a recycle/reuse project here on the blog.

Lots of people call it “upcycling” when you repurpose otherwise discardable materials into something useful; and as a frequent hoarder <ahem> rescuer-of-landfill-bound items, this is music to my ears. I pretty much say “don’t throw that away, I can use it later” about 10 times a day. Just ask my mother…

Anyway, enough about me and my tendencies…Many of you will probably be familiar with recycled rolled magazine housewares, such as frames and bowls and coasters, and the above frame is just exactly that. It is made from rolled strips of a mail-order catalog that we were no longer using. Even if you take yourself off of every mail list there is, you’ll usually end up with at least a few leftover magazines or catalogs at some point. Glossy ads in the Sunday paper will count in this category too. So, when you feel like getting rid of some excess paper, but you want to keep it out of the landfill, this project is for you. Please click the link for the tutorial. Thanks all and happy Earth Day!

Continue reading ‘Roll your own and save the planet’

Quick and Dirty – and Tasty – Easter project

Easter is now upon us, and I confess it kind of snuck up on me this year. I really wanted to put a crafty foot forward on this lovely spring occasion, but it’s already the big day, and there is still  SO much to do…

So while driving home from the grocery store yesterday (which was MOBBED thankyouverymuch), I had a thought. [cue the Windows 7 commercial version of me here]: A quick and dirty Easter project for us crafty last-minute-Annies! (and Alfreds if you’re reading this guys)

Chocolate egg nests!

I figure that these would make good cake or cupcake toppers, or a nice little item to put on each guest’s plate before Easter dinner. You could even put people’s names on little cards and stick them in the nests for assigned-seating occasions. For the tutorial, please continue after the jump. Happy Easter everyone!

Continue reading ‘Quick and Dirty – and Tasty – Easter project’

Tray-ed ya!

I don’t know about you, but, when I craft, I completely take over some part of the house. I take my gigantic mass of supplies and just spread them all over dining room tables, floors, couches, or whatever else is handy (or currently empty).

But, while this method may make perfect logical sense to me, it may not always improve relations with those with whom I live.  So, having a portable craft station that’s easy to relocate when I’m ready to take a break can be of tremendous help.

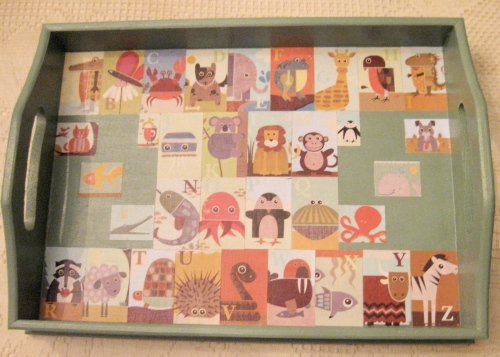
Take for example, the above tray.  It is just about the perfect size for a half-done crocheted hat, a skein of yarn, and an instructional pattern book. And when it’s time to stop doing your craft project for a little while, you can just pick up the tray and you’re off to your next destination. And then people can actually eat at the dining room table.

Also, the tray itself can even BE a craft project. To see how I made the above tray, please keep on readin’… Continue reading ‘Tray-ed ya!’


Enter your email address to subscribe to this blog and receive notifications of new posts by email.

Join 3 other subscribers

Pages of this blog

Blog Stats

  • 13,650 hits